
Vaadin is a set of tools to create web applications tailored to both, client-side and server-side developers. If you are, say, a JavaScript Developer, you can use Vaadin Components in any HTML document. If you are a Java Developer, you can use the provided Java API and forget about coding any HTML or JavaScript at all.
In this article, I’ll show you how to create the famous Hello, World application using the Java Programming Language and Vaadin 12 (also valid for Vaadin 10 and 11). Get comfortable, make sure you have Maven installed, fire up your favorite IDE, and let’s get started!
Start with a starter, obviously#
Go to https://vaadin.com/start/latest and select Project Base. This is the most straightforward project starter and serves well as an initial point. Click Download and extract the zip file. You should get a directory with a Maven project in it. Import this project into your favorite IDE (mine is IntelliJ IDEA, by the way).
You should get a directory structure that looks similar to the following:
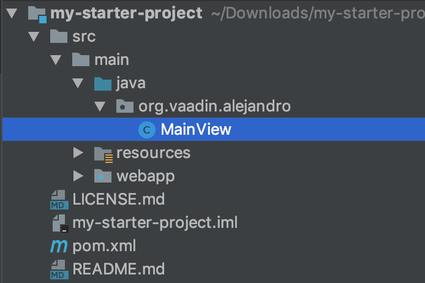
Let’s not worry about the resources and webapp subdirectories for now. Also, I want you to get your hands dirty and implement the example app by yourself. However, it turns out the starter includes the MainView class with kind of a Hello, World application in it. So, let’s get rid of the code in the MainView class by removing any annotations, extended classes, and code in the constructor. Go ahead and remove code until it looks like the following (or delete the file and create a new one):
package org.vaadin.alejandro; // use yours, of course

public class MainView {

    public MainView() {
    }

}
The project is ready. Let’s add some code to it!
Add UI components to the web page#
Think of the MainView class as the web page shown when you request the app in the web browser. Let’s start by doing the simplest Hello, World app we can do with Vaadin–a web app that shows a greeting on the screen.
First off, we need the MainView class to be of a type that Vaadin recognizes as a UI component it can deal with. You have many options, but we will extend a popular class called VerticalLayout:
package org.vaadin.alejandro;

import com.vaadin.flow.component.orderedlayout.VerticalLayout;

public class MainView **extends VerticalLayout** {

    public MainView() {
    }

}
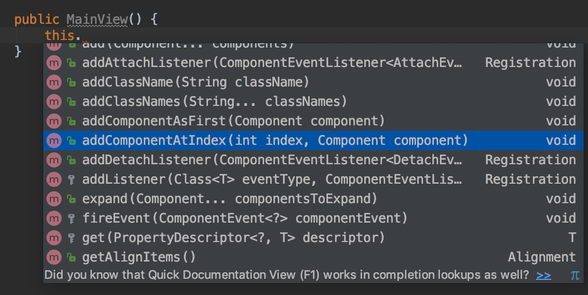
Now the MainView class has more powers. Check in your IDE some of the methods available in VerticalLayout. You can use the autocompletion feature of your IDE to quickly explore what’s available:
What is a VerticalLayout, though? A VerticalLayout is a UI component that arranges other UI components (like buttons or grids) in a vertical fashion or a column if you wish. You do this by using the VerticalLayout.add(Component...) method. But first, we need to prepare the component we want to add to the VerticalLayout. Let’s use a very simple one: Text. Go ahead and create a new instance of this class inside the constructor:
public MainView() {
    Text text = new Text("Hello, World!");
}
Now call the add(Component...) method to actually add the text component to the VerticalLayout:
public MainView() {
    Text text = new Text("Hello, World!");
    add(text);
}
Expose the view as a web page#
To serve this class as a web page, you need to tell Vaadin you wish to do so. Doing this is super easy. Just annotate your MainView class with @Route:
@Route
public class MainView extends VerticalLayout {
    ...
}
The @Route annotation accepts an optional parameter to specify the actual route (the last part of the URL) you want to use to show this view. For example, @Route("hello") would make the view available at http://localhost:8080/hello. However, Vaadin uses a convention with the class name. Since our class is named MainView, Vaadin exposes the view at the context root (http://localhost:8080/). Moreover, if you add a class named CustomersView, for example, Vaadin exposes the view at http://localhost:8080/customers (note how the “View” part in the class name is ignored). Any other names are exposed using the class name. Just remember that you can override this by using the String parameter in the @Route annotation.
Deploy and run the web application#
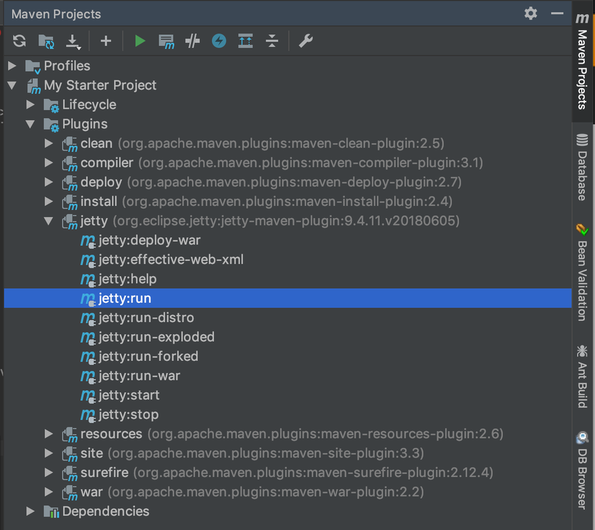
Since we used a Vaadin starter to create the project, the pom.xml file includes the Jetty Maven plug-in which allows you to use Maven to deploy and run the web application in a local Jetty server. The quickest way to run the application is by using a command line terminal and run:
mvn jetty:run
However, I recommend creating a run configuration in your IDE. A run configuration is like a shortcut inside the IDE to execute an action, for example, a Maven command. Most IDEs offer the possibility to create this from a Maven view that shows all the plugins and its corresponding goals. In IntelliJ IDEA it looks like the following:
You can simply double-click the jetty:run option to deploy the app and start the Jetty server, or you can right-click the option to create a running configuration that will be shown on the top of the IDE’s window. This last method has the advantage of offering a keyboard shortcut for the running configuration as well. You can alternatively use any other server that includes a Servlet Container to deploy and run the application. For example Tomcat or GlassFish. We won’t cover this topic here. There are plenty of useful resources on the web that explains how to use these servers.
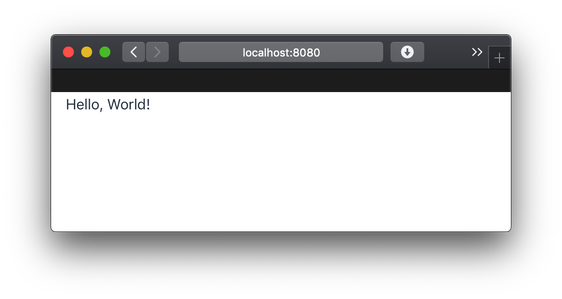
Once the app is compiled, point your browser to http://localhost:8080 to see the result. Keep in mind that the compilation may take some time the first time you are doing it since you might not have all the Maven dependencies in your hard drive, but this is going to be much faster afterward, for both this project and new ones as well. Here’s a screenshot of the application:
Add behavior to the web application#
Vaadin includes many ready-to-use UI components. There are buttons, combo boxes, grids, check boxes, text fields, charts, and many others. Let’s use the TextField and Button classes to add some interactivity to the web application.
Start by creating instances of these two classes in the constructor:
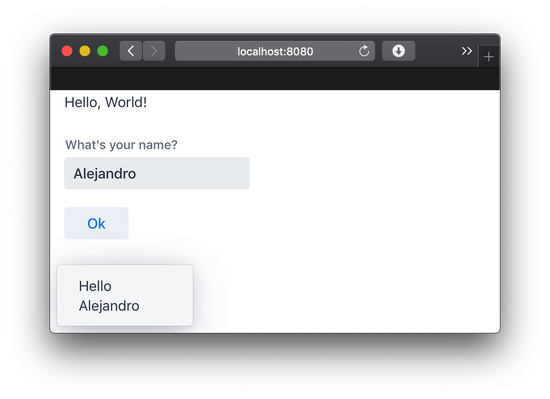
TextField textField = new TextField("What's your name?");
Button button = new Button("Ok");
We want to show a personalized greeting containing the name introduced in the text field anytime the user clicks the button. The way you react to user actions (like clicking a button) is by adding listeners. In the case of a Button, a click listener:
button.addClickListener(e -> ... your custom code here ...);
Let’s use yet another Vaadin UI component to show a message:
button.addClickListener(e -> Notification.show("Hello"));
The greeting is not personalized yet. We want to use the name introduced in the text field as part of the greeting. We can get this value by using the TextField.getValue() method. Cannot be easier:
button.addClickListener(e -> Notification.show("Hello " + textField.getValue()));
There, you have new components and behavior in your app. We are just missing one last thing–we created and configured UI components, but we never added them into the VerticalLayout. Use the add method to fix this:
add(textField, button);
Restart the Jetty server and go to http://localhost:8080 to see the changes:
What next?#
There are many other cool features in Vaadin. I would suggest you continue with the official Vaadin Tutorial at https://vaadin.com/tutorials/getting-started-with-flow which explains how to build a more real-life application. If you want to master Vaadin, I suggest reading the documentation at https://vaadin.com/docs.